Posts

The Making of a Chandelier: Final Reveal
Image
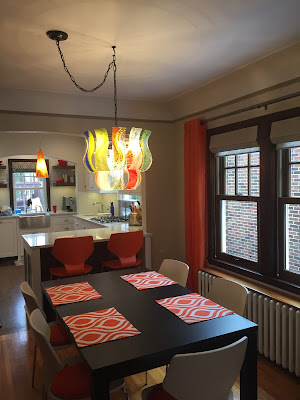
The moment we have all been waiting for ... IT. IS. FINISHED. Cue the applause and rejoicing. Special thanks to my amazing husband for all his help and support with my most ambitious project yet. The final weight with all the glass panels was close to 35 pounds so we made sure to use a heavy-duty chain and hanger that is screwed directly into the ceiling joists. This thing may be heavy, but it is not going anywhere. I am so pleased with the final result that I smile every time I turn it on. It adds an intense pop of color to my otherwise mostly white and grey house. Alternating smooth and textured panels create visual contrast and balance while the gentle swirl in the design and curvature of the glass provide movement. It makes me happy. Now I find myself casually hunting for other discarded vintage light fixtures that I can transform into works of art ... See Also: The Making of a Chandelier: Part 3

The Making of a Chandelier: Part 3

Image
I bet you thought I was never going to finish this project. To be perfectly honest, I often wondered that myself. After firing 20 pieces of glass, it was time to prepare them for hanging. My precision engineer of a studio partner (aka my husband) took the calipers to the chandelier frame and determined that a 3/16" hole would be the right size to allow enough wiggle room to not stress the glass. Off to Amazon to purchase a 3/16" diamond drill bit. My handy hubby rigged up a little system to keep the glass cool/wet and hold it in place to make the drilling process much easier. I picked up a little baking pan from the store and we secured a small piece of scrap wood to the bottom to give the drill bit a cushion. He then attached a couple of handy wood-working clamps to the side to help hold the glass firmly in place. Add some cold water to cover completely and start drilling! True confession: I hold my breath during this process. I don't know why. I always seem to hold...

The Making of a Chandelier: Part 2

Image
I need a bigger kiln. Of course I have been saying that for years already ... but this time I meant it . My chandelier design calls for 3.5" x 12" panels. So I went and bought myself an early birthday present. And then my fabulous husband built me a stand. This is true love right here folks: My new baby! ProFusion 16 In addition to a bigger kiln, I needed to stockpile a lot of glass too. Heaven forbid that gorgeous stand my hubby built have any bare shelves. I filled it. And then some. I knew I wanted color, texture, and movement in this chandelier. After a couple of prototype panels, I finalized the design. Now it was just a matter of building the individual glass panels. All 20 of them. In order to keep the overall structure lightweight, I went with single layer panels. Glass naturally wants to be 6mm thick, so in order to keep it 3mm I chose to break all the rules: I tack-fused and slumped all in one firing. Cue the shock and horror. rule breaker! fuse and ...

The Making of a Chandelier: Part 1

Image
I have been dreaming of a colorful art glass chandelier for my dining room ever since I laid eyes on a Chihuly chandelier in Las Vegas. I cannot afford a Chihuly chandelier. Or even a knock-off copy of one ... so I set out on an adventure to make my own. I do not have a hot shop with a glass blowing furnace. This required me to stretch my creativity and design a piece that would work with kiln-formed (fused) glass, but still have that light and translucent blown glass feel I love. Step 1: Build a frame . Or better yet, find an antique one that could be re-purposed for use with fused glass panels. My husband told me that we do not have a big enough studio to take up welding at this time. Someday I will learn how to weld too. Someday. This proved to be a bigger challenge than I thought. I scoured auction sites, antique dealers, and craigslist until I finally found what I was looking for. Only it was that ugly old brass that had definitely seen better days. BEFORE ...

Must Have Earrings

Image
I haven't worn earrings in 10 years - or basically since my oldest was born and I felt that very first baby grab at the pretties that nearly yanked my ear off. I pretty much gave up all jewelry at that point. After my youngest was old enough to leave them alone, I slowly started wearing rings and necklaces again, but for some reason my ears remained naked. Until now. My friend Sydnie has a thing with earrings. She likes them big and long and insists all ears should have them. I became rather entranced with the 'statement' earrings she always wears and decided I must have some. So I busted out my supplies that have been tucked away in nice little baggies and boxes and went to town. It was an earring making spree I tell you. After keeping a few pairs for myself, I decided these needed to adorn the ears of my customers. They are fun. These are super light and hang so nice that you just can't help but shake your head back and forth a little just to whip them at yo...

Sushi Plates - Fusing Ideas for Beginners

Image
Sushi plates are the ultimate de-facto canvas for fused glass artists. The simple slightly curved shape is one of most foolproof slumping forms that even beginning artists can master. The smaller canvas sizes are easy to work with and allow you to use up little bits and pieces of leftover glass from bigger projects ... or stretch your creative process to try new things and experiment without fear of wasting a ton of materials. These little plates are all approximately 5 inches square - which is a nice versatile dish for a multitude of purposes. They also come in a 3 inches square size. Small sushi dishes can become candle holders, spoon rests, catch-all trays, or even used as an actual serving dish. The steeper the sides, the more you have to pay attention to your kiln and slumping temperature as well as hold time. If you go too hot or too long, you risk getting the 'dog bone' effect or having all your glass pool to the bottom. The beauty of the sushi plate mold is that it i...

Fused Glass Ornaments: Fun for Kids

Image
My little ones have been begging to get in the glass studio with me for quite some time. I haven't felt comfortable with the idea until now. Christmas ornaments seemed like the perfect project for kids to introduce them to the art of glass. Christmas Ornaments 2014 I pulled a bunch of pieces out of my scrap bin and ran any rough edges through the diamond grinder so they weren't sharp. I had amassed a collection of pre-fused frit balls and broke up a bunch of colored stringers and let them create their masterpieces.  by Nadia, age 7 & Benno, age 5 Previously I pinned a bunch of cute examples to my Pinterest board, pulled it up on the iPad and let them choose what they wanted to make. It was so much fun watching them design and create with very little guidance from me. I think they turned out fabulous!  by Nadia, age 7 It is almost hard to see them all go to new homes with family, but I believe they will be very much appreciated.  Merry Christmas an...

Recent Etsy Listings