The Making of a Chandelier: Part 3
I bet you thought I was never going to finish this project. To be perfectly honest, I often wondered that myself.
After firing 20 pieces of glass, it was time to prepare them for hanging. My precision engineer of a studio partner (aka my husband) took the calipers to the chandelier frame and determined that a 3/16" hole would be the right size to allow enough wiggle room to not stress the glass.
After firing 20 pieces of glass, it was time to prepare them for hanging. My precision engineer of a studio partner (aka my husband) took the calipers to the chandelier frame and determined that a 3/16" hole would be the right size to allow enough wiggle room to not stress the glass.
Off to Amazon to purchase a 3/16" diamond drill bit.
My handy hubby rigged up a little system to keep the glass cool/wet and hold it in place to make the drilling process much easier.
I picked up a little baking pan from the store and we secured a small piece of scrap wood to the bottom to give the drill bit a cushion. He then attached a couple of handy wood-working clamps to the side to help hold the glass firmly in place. Add some cold water to cover completely and start drilling!
True confession: I hold my breath during this process. I don't know why. I always seem to hold my breath when I am doing something that has a high 'cry factor' if it goes wrong. I decided to promote the hubs to studio apprentice and ask him to take over the drilling. Because he is my hero and loves playing with power tools, he happily obliged. I couldn't even watch.
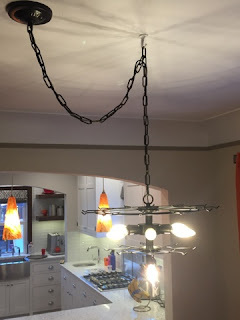
While the process of drilling 20 glass panels was nearing completion, it was time to hang the frame. Of course nothing is straightforward when you are dealing with a 1930s built house, but after tinkering around with the wiring, electrical boxes, and stud finders it is up!
Next up: hanging the glass panels. Stay tuned for the big reveal coming soon.
See Also: The Making of a Chandelier: Part 2


Comments
Post a Comment